
 ultimate-guide
Raw Fur Pelts for Taxidermy: A 2026 Buyer's Guide
Table of Contents
- What Makes a Raw Fur Pelt Worth Buying
- Taxidermy Pelt Grading Standards Explained
- Legal Requirements for Buying Wild Fur
- How to Preserve Raw Animal Hides Before Taxidermy
- Storing Raw Fur Pelts for Taxidermy: Temperature and Pest Control
- How to Buy Raw Fur Pelts for Taxidermy
- Conclusion
- Frequently Asked Questions
Last Updated: September 17, 2026
What Makes a Raw Fur Pelt Worth Buying
Prime fur is the single biggest factor separating a pelt that mounts cleanly from one that fights you at every step. Raw fur pelts for taxidermy are graded on fur density, guard hair condition, leather integrity, and how the animal was handled after harvest, and those four factors determine both price and how much prep work lands on your bench. This guide from Ethically Fur breaks down what buyers actually need to inspect before money changes hands.
A common mistake is judging a pelt by the photo alone. Fur that photographs thick can be rubbed bare along the flanks, and a clean-looking back says nothing about whether the hide was properly cooled in the field.
What some buyers miss is that the handling before the sale matters as much as the animal itself. A prime winter pelt left in a warm truck overnight can slip hair before it ever reaches a buyer. The Association of Fish and Wildlife Agencies guidance on fur handling notes that proper field care is the difference between a marketable pelt and a loss.
Taxidermy Pelt Grading Standards Explained
Grading is the language sellers and buyers use to price fur, and it follows a simple scale from flawless to heavily damaged. Understanding the tiers keeps you from overpaying for a pelt that only looks good in a listing thumbnail.
Primary Grades: I, II, and III
Grade I pelts show dense, unbroken fur with no rubs, holes, or slippage. These command the highest prices and suit life-size mounts where every inch is visible.
Grade II pelts carry minor flaws, a small rub, a repaired tear, or slightly uneven fur. They work well for shoulder mounts or projects where the flaw sits in a hidden area.
Grade III pelts have noticeable damage but remain usable for smaller pieces, practice work, or craft projects. Many taxidermists keep a few on hand for testing new techniques.
Damage Classifications That Lower Value
Common defects that drop a pelt a grade or more include:
- Rubs: Worn patches where fur has broken or thinned
- Slippage: Loosened hair from poor cooling or delayed preservation
- Holes and tears: From shot damage or rough skinning
- Singed fur: From improper drying near heat sources
- Mold and mildew: From damp storage before sale
Legal Requirements for Buying Wild Fur
Buying wild fur legally depends on species, state rules, and whether the animal is protected under federal law. Most common furbearers, raccoon, coyote, fox, and muskrat, move through normal commercial channels, but threatened or protected species carry restrictions that can turn a routine purchase into a violation.
A few rules apply almost everywhere:
- Confirm the species is legal to sell in your state and the seller's
- Check whether your state requires a fur buyer's license
- Ask for documentation showing legal harvest or origin
- Understand that migratory birds and most raptors are federally protected and cannot be sold
The U.S. Fish and Wildlife Service oversees federal protections, and individual state wildlife agencies set their own seasons and sale rules. When a listing feels vague about origin, that vagueness is the answer.
How to Preserve Raw Animal Hides Before Taxidermy
Preservation starts the moment the animal is harvested and ends when the hide is stable enough to store or ship. The goal is to stop bacterial action that causes slippage while keeping the leather in condition for later tanning or mounting.
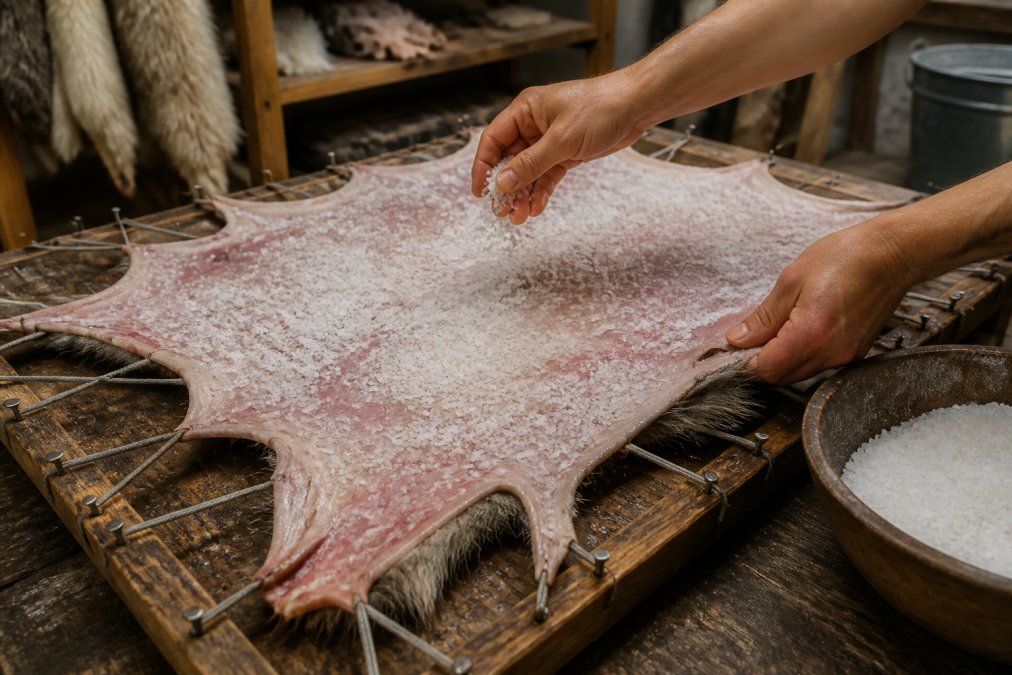
A taxidermist's hands applying salt to a stretched raw animal hide on a wooden workbench, with tools and gloves nearby in a workshop setting
Fleshing, Salting, and Drying Steps
- Cool the hide fast. Get the pelt off the carcass and cooled as soon as possible.
- Flesh the hide. Remove all meat, fat, and membrane from the leather side. Fat left behind prevents salt from penetrating.
- Apply non-iodized salt. Cover the entire flesh side with a thick, even layer. Use fine salt, not rock salt.
- Drain and re-salt. As salt pulls moisture, it forms brine. Pour it off and apply fresh salt until the hide stops weeping.
- Dry flat or on a stretcher. Keep the hide out of direct sun and away from heat. Air movement does the work.
- Check for stiffness. A properly dried hide feels firm and dry, not tacky.
How to preserve raw animal hides comes down to one principle: remove everything that can rot, then remove the water. Skip a step and the pelt will tell you later.
Storing Raw Fur Pelts for Taxidermy: Temperature and Pest Control
Storing raw fur pelts for taxidermy means controlling two threats: moisture and insects. A dry, cool, dark space with good airflow keeps a salted or dried pelt stable for months, but warmth and humidity invite mold and dermestid beetles that can ruin a hide in weeks.
A workable storage setup:
- Keep the space cool and dry, away from damp basements
- Store pelts flat or rolled loosely, never compressed in sealed plastic
- Use breathable containers or cotton bags
- Add pest control, cedar, or approved insect deterrents
- Inspect stored pelts every few weeks for signs of insect activity
How to Buy Raw Fur Pelts for Taxidermy
The best purchases come from sellers who can answer specifics about harvest, handling, and grading without hesitation. A marketplace built around transparent sourcing, like Ethically Fur, makes those answers part of the listing rather than a follow-up email.
Questions to Ask Before You Buy
Run every seller through the same checklist:
- What grade is this pelt, and who assigned it?
- How was the animal harvested, and when?
- How was the hide cooled, fleshed, and preserved?
- Are there rubs, holes, or slippage I should know about?
- Can you provide documentation of legal origin?
- What is your return policy if the pelt arrives damaged?
Factor to Check | What Good Looks Like | Red Flag |
|---|---|---|
Fur condition | Dense, even, no rubs | Thin patches, matted fur |
Leather | Clean, fully fleshed | Fat or membrane left on |
Preservation | Salted or dried properly | Tacky, damp, or moldy |
Documentation | Legal origin provided | Vague or missing answers |
Grading | Clear grade stated | "Looks great" with no grade |
Conclusion
Sourcing quality raw fur pelts for taxidermy comes down to knowing what you are looking at and who you are buying from. Grade the fur, verify the preservation, and confirm the paperwork before you commit. At Ethically Fur, we connect buyers with wild-harvested and responsibly sourced pelts through listings that prioritize transparency, direct access to North American sellers, and a browsing experience built around your specific project needs. Browse listings and find the pelt that fits your next mount.
Frequently Asked Questions
What is the difference between raw and tanned fur pelts for taxidermy?
Raw pelts are untanned, meaning the hide has not been chemically treated to stabilize the skin. They must be preserved through salting, drying, or freezing to prevent spoilage before taxidermy work begins. Tanned pelts have gone through a chemical process that permanently softens and preserves the hide, making them ready for mounting or display. For taxidermy, raw pelts give you more control over the final result because you handle the tanning yourself. Tanned pelts save time but limit your ability to adjust thickness or shape during mounting.
How do you properly store raw fur pelts before taxidermy?
Storing raw fur pelts for taxidermy requires cold temperatures and protection from pests. Freeze pelts at 0°F (-18°C) or colder in airtight bags with as much air removed as possible. If freezing is not an option, salt the hide thoroughly and keep it in a cool, dry space below 50°F (10°C). Check stored pelts monthly for signs of freezer burn, mold, or insect activity. Never store raw pelts at room temperature for more than a few hours after fleshing. Label each pelt with the date and species so you can track how long it has been in storage.
Are there legal requirements for purchasing wild-harvested fur pelts?
Yes. Legal requirements for buying wild fur vary by state and species. Federally, the Lacey Act prohibits buying or selling wildlife taken illegally, so you need proof of legal harvest. Many states require trappers to tag or register pelts before sale, and some species like bobcat and otter fall under CITES export rules. Before buying, ask the seller for harvest documentation, check your state wildlife agency's rules, and confirm the season was open when the animal was taken. Buying from a marketplace that verifies seller documentation reduces your legal risk.
How can you identify high-quality raw pelts for taxidermy work?
Check three things: fur density, hide condition, and grade. High-quality raw fur pelts have thick, even fur with no bald patches or matting. The hide should be flexible, not stiff or brittle, with no visible cuts, holes, or slippage (where fur pulls away from the skin). Taxidermy pelt grading standards classify pelts from Grade I (prime, minimal damage) to Grade IV (heavily damaged). Ask the seller for clear photos of both sides of the pelt and confirm the grade before purchase. Prime winter pelts from cold climates typically have the densest fur.